
Ultimate Guide to coreActivity
When a setting changes, a plugin is updated, or someone asks about an unexpected account action, a record of recent activity gives you a starting point. coreActivity brings supported WordPress activity together in one log, with context that helps you investigate what happened and when.
Its components monitor events such as changes to content, users, plugins, and settings. You choose which events to track, inspect entries with filters and detailed dialogs, and optionally receive notifications about the activity that matters to you. Integrations add events for supported plugins, and a multisite network can be managed from a central panel.
What can coreActivity help you do?
- Investigate a change: narrow the log by event, component, user, IP, or object, then inspect the time and available details around an entry.
- Follow important activity: choose individual events for instant notifications or daily and weekly digests instead of watching the log continuously.
- Keep the log useful: enable the events you need, use supported exceptions and duplicate controls, and set a retention period for older entries.
- Work across a network: review the centralized log in Network Admin while individual site panels show their own site’s entries.
For example, if an administrator reports an unexpected plugin change, you can open Logs, focus on the relevant plugin activity, and examine the recorded time, user, and event details. The available context depends on the event and your settings; a log entry is a starting point for investigation, not proof of a person’s identity.
This guide takes you from installation through configuring events, reviewing entries, setting up notifications, and maintaining the log. The screenshots illustrate the workflow; some show an earlier version of the interface.
Before you begin
Check the system requirements and make sure you have access to the WordPress administration area. On multisite, coreActivity is network activated; use Network Admin for the centralized settings and event controls. Individual sites have a site-specific log view. See Multisite Support.
Decide which activity you need to keep, who should have access to the logs, and how long the records should remain available. Request URLs and event metadata can contain information supplied by users or other applications. Log Data and Retention explains what can be recorded and how cleanup works.
Install and configure coreActivity
- Install and activate coreActivity from the WordPress Plugins panel. On multisite, activate it for the network.
- Open the coreActivity administration panel and complete the plugin’s installation checks if prompted.
- Open the Setup Wizard to configure the main logging and display options. You can adjust them later in Settings.

The wizard walks through these choices:
- Intro: forwarded IP handling, duplicate suppression, referrer and user agent logging, device detection, and the admin bar menu. Review your proxy setup before considering forwarded headers; a valid-looking header is not proof of the visitor’s address.
- Geo Location: whether to store country codes and expanded location metadata. Provider and database credentials are configured in Geo Location settings.
- Log: whether to display country flags, user avatars, and the device detection column.
- Notifications: whether to enable instant, daily, and weekly notifications. Event-specific notification switches are configured separately.
- Finish: complete the wizard and choose whether to keep it available.
The wizard does not cover every setting. Follow the installation guide and Setup Wizard guide for more detail, then review the full Settings panel.
Check the Dashboard
Open Dashboard for an overview of components, events, log storage, recent statistics, and geolocation information. The logging status indicates whether the main logging switch is active. If logging is disabled, enable it from the Dashboard before expecting new entries.

The Dashboard guide explains the individual sections. Counts and available components depend on your site and active integrations.
Choose events to record
An event belongs to a component. For example, a component can monitor user activity or changes to posts; other components become available when their supported plugins are active. An event needs to be enabled before coreActivity records it.

- Open Events and use the component filters or search to find the activity you want to review.
- Check the event’s Status and availability. Enable or disable the event with its status toggle. Bulk actions can change selected events together.
- Start with the events you need. Some events, including REST API reads and several metadata events, are inactive when first registered because they can produce many entries.
- If you want an event included in emails, configure its notification switches as described below.
The Logs and Events Management guide walks through event selection, log investigation, notifications, and cleanup. The Events panel guide covers the controls and inactive defaults. For the full catalog, see Components and Events and the List of Events. An integration’s events depend on the corresponding plugin being active.
Find and inspect activity
Open Logs to review entries. The table identifies the event and can show the associated user, object, IP, time, and other fields when available. On a network, the network view can include multiple sites; a site’s own view is limited to that site.
Narrow the results
Use the search box, period selector, and available filters to focus on the activity you need. Depending on the view, you can narrow results by component, event, context, country, method, and object type. Row actions can open related logs for a particular user, event, IP, or object. A focused view and a filter both narrow results, but present the selected value differently in the table.
For example, to investigate a user-related event, find an entry, follow its user log action, and review the surrounding entries and times. Clear the search and filters when you want to return to a broader list.
Open entry details
Use the row’s metadata toggle to show additional information beneath the entry. Select View on the entry to open the Log Data dialog. Its tabs show the main fields and, where available, metadata, location, and device information. The data depends on the event and the options enabled when it was recorded.
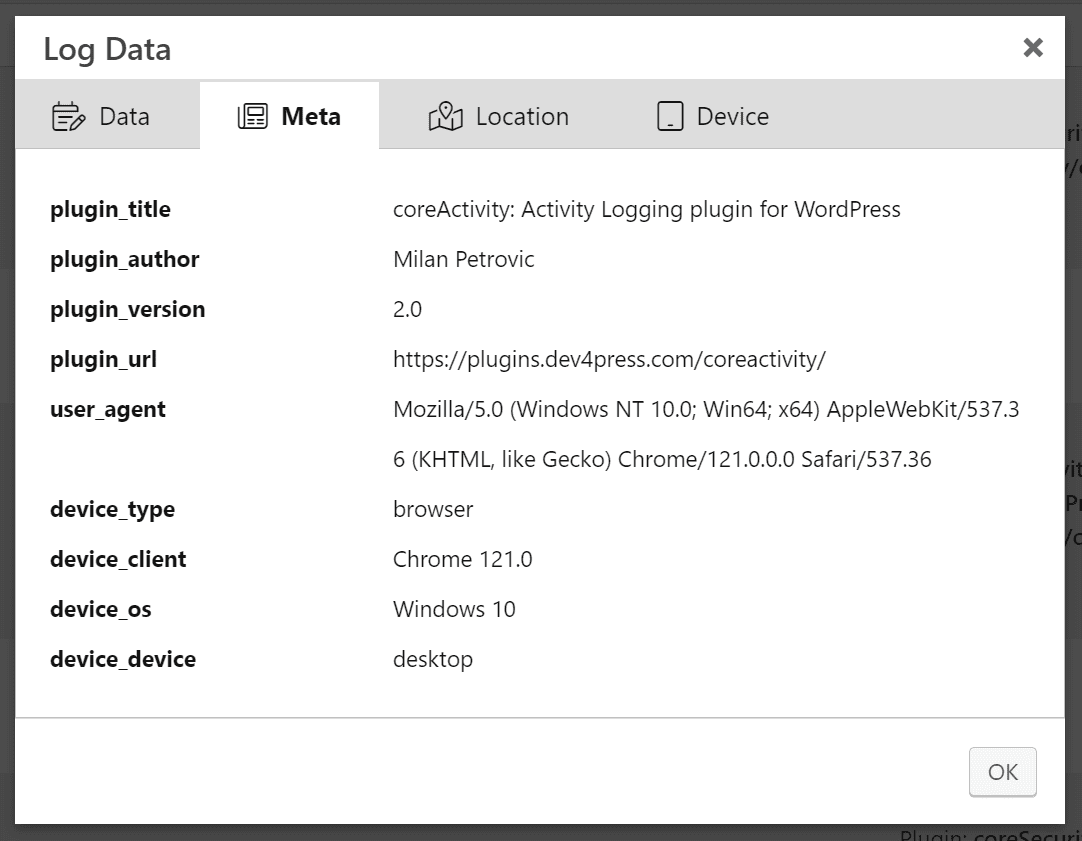
The IP, user agent, and location are useful context, but should not be treated as conclusive identification. User agents can be spoofed, proxy configuration affects the selected IP, and geolocation is an estimate. See Detecting Visitor IP and Request Device Detection.
Adjust the table
In Settings → Logs Panel, choose display options such as simplified event labels, avatars, country flags, and additional columns. The IPv4 display option masks parts of an address in the interface; it does not remove the stored IP.
If Live Updates is enabled, the open Logs panel requests new matching entries every 10 seconds. The current view and filters still determine what appears. For more on rows, dialogs, and deletion, see Activity Logs and the Logs and Events Management guide.
Configure geolocation
Geolocation can add context to an IP address. In Settings → Optional Data, choose whether to store a country code or expanded location metadata. Then select a method in Settings → Geo Location.

The online method uses GeoJS.io. The local methods use IP2Location or MaxMind databases and require the relevant provider token or license for downloads. Online lookups depend on an external service; local lookups depend on the downloaded database being available and updated. Provider results vary and may be missing or inaccurate.
See Activities GEO Location, IP2Location, and MaxMind GeoLite2 for setup and limitations.
Set up notifications
Notifications are optional. coreActivity supports instant notifications and daily or weekly digests. Setup has two parts: enabling the notification type in Settings and choosing the events that should use it.
- In Settings → Notifications, enable the desired type and set its recipient addresses and delay or schedule. If no recipient is specified, the plugin uses the site admin email.
- In Events, enable the desired notification switch for each event. To change many events at once, use Tools → Notifications.
- Trigger an enabled event and check the log and delivery. The instant delay limits repeated messages; scheduled notifications depend on WordPress cron and mail delivery.

See Activities Notifications for the differences between instant emails and digests, and the Notifications tool for bulk control.
Maintain the log
Activity tables grow as events are recorded. Review their size on the Dashboard and set a retention period that suits your site. In Settings → Maintenance, automatic cleanup can remove entries older than a configured number of months. New installations default to 24 months with automatic cleanup enabled; existing sites may have different settings. The scheduled job depends on WordPress cron.
For a targeted cleanup, open Tools → Data Cleanup, select the age and events, and review the selection before running it. You can also delete selected entries from the Logs table. These actions remove data and cannot be undone by the plugin.

Export Settings exports plugin configuration, not the event or log tables. The Reset / Remove tool can affect settings, downloaded geolocation files, and database data depending on what you select. Review the options and make an appropriate backup before removal. See Log Data and Retention, Activity Tools, and Plugin Maintenance and Removal.
If something is missing
If an expected entry does not appear, check the main logging switch, the event’s status and availability, current log filters, exceptions, and duplicate suppression. A page served entirely from a cache without loading WordPress cannot be recorded by coreActivity; see Cache Plugins.
For notification, geolocation, setup, and live update checks, use Troubleshooting coreActivity. The Frequently Asked Questions provide quick answers, and How Activity Logging Works describes the fields in more detail.
