
Ultimate Guide to BreadcrumbsPress
BreadcrumbsPress creates breadcrumb navigation for your WordPress site. A breadcrumb trail shows visitors a route through the site, for example Home → Category → Post, and can provide links to earlier levels. The plugin can also output breadcrumb structured data for search engines.
This guide takes you from installation to a working trail, then explains how to control its content, appearance, and placement. For individual controls, follow the links to the detailed articles.
Choose an edition
The free Lite edition generates a single breadcrumb trail for supported WordPress content and pages. It includes the Breadcrumbs block, an Elementor widget, shortcodes, theme and action integration, and controls for paths, visibility, and styling.
Multi breadcrumbs, menu breadcrumbs, and the length-control tweaks described in this guide require BreadcrumbsPress Pro. See Pro pricing and plans.
Pro can generate several available routes to the same post, render a navigation menu as a trail, collapse long trails, and shorten long intermediate crumb text. Compare the editions in Free vs Pro, or learn more on the plugin home page.
Install and open BreadcrumbsPress
- Check the system requirements and back up your site. The plugin requires WordPress 6.7 or newer and PHP 8.1 or newer.
- Install and activate Lite from the WordPress plugin directory or a ZIP file. For Pro, upload the Pro ZIP provided with your purchase and activate the plugin.
- If you use Pro, enter your license key when prompted. Follow the plugin’s setup screen if it appears.
- In the WordPress administration area, open Settings → BreadcrumbsPress.
For detailed steps, including upgrades and updates, see Install & Update and License Activation. For a map of the administration area, see Plugin Panels Organization.
Get your first trail on the site
Installing the plugin does not necessarily place a visible trail in your theme. Choose a placement method, configure the trail, and test it on the pages where visitors will use it.
Check the Overview
The Overview dashboard shows the active theme and current integration method. Its status card reports recent current-page breadcrumb activity, while the integration card links to settings and provides examples for manual use.
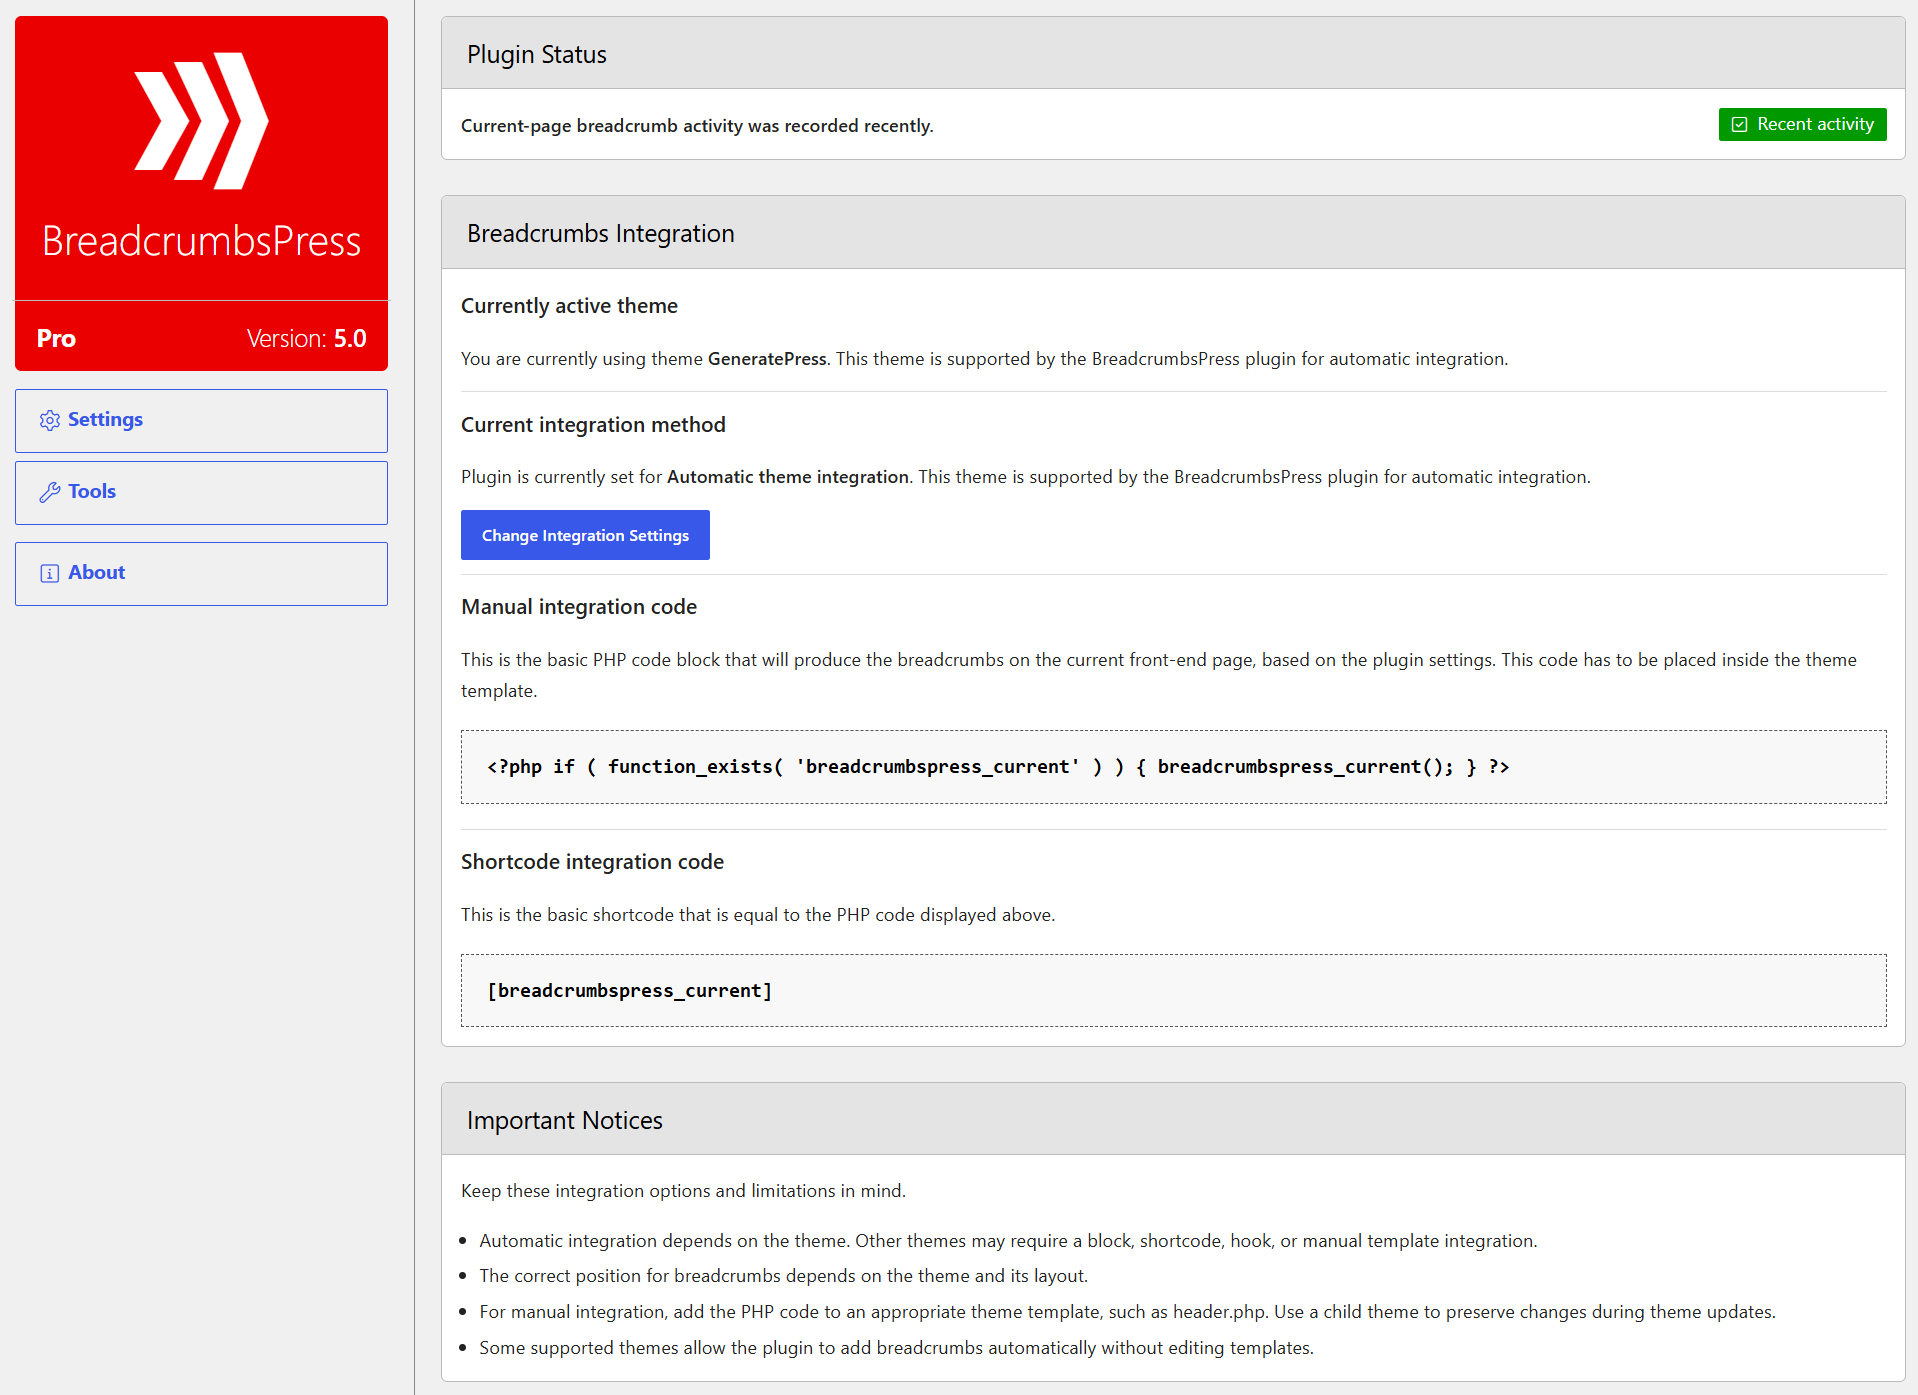
The activity indicator is useful, but caching and other breadcrumb methods may not be reflected in it. Check the front end as well. See Dashboard and Overview.
Choose where to place breadcrumbs
Use one suitable method for each location:
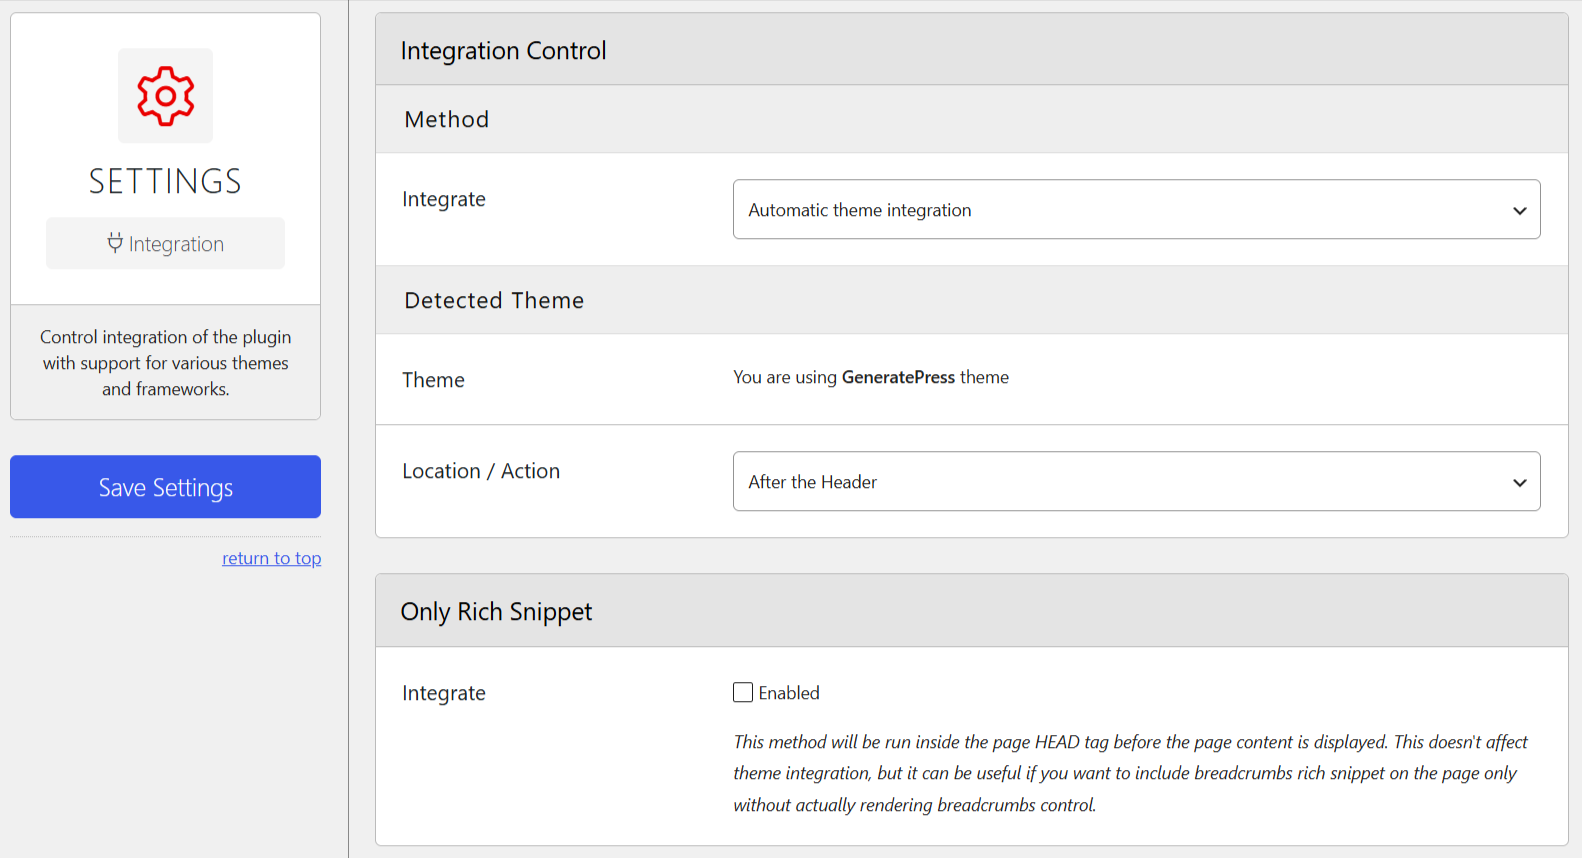
- Supported theme: open Settings → Integration, choose automatic theme integration or select a supported theme manually, then choose an available Location / Action. Save and inspect the result.
- Block editor: add the Breadcrumbs block to a page or an appropriate template.
- Elementor: add the Breadcrumbs widget to a page or template. It requires Elementor 4 with atomic widgets available.
- Shortcode: insert
in a Shortcode block or another shortcode-enabled area. See Single Breadcrumbs Shortcodes. - Theme action or PHP: configure a specific action in Integration settings, or place the PHP example from Overview in an appropriate theme template. Use a child theme for template changes.
Directly supported themes
BreadcrumbsPress includes integration for Astra, Blocksy, GeneratePress, Genesis Framework, Kadence, OceanWP, and Storefront. In Settings → Integration, choose Automatic theme integration to detect a supported theme, or choose Integration with supported themes to select one manually. Then select the desired Location / Action and save. The available locations depend on the theme.
Automatic integration depends on the active theme and its available hooks. A supported theme may still need styling or a different location. If you place a block, widget, shortcode, or PHP code yourself, check that automatic integration or another breadcrumb plugin is not already outputting a trail in the same spot. See Settings: Integration for the options.
Test the result
Visit a post, a page, and an archive relevant to your site. Check that the trail appears in the intended location, its links lead to the expected pages, and it works at narrow screen widths. If a trail is missing, check both the placement method and the page-type visibility setting. Save any changes and retest.
Configure the trail
Open Settings → BreadcrumbsPress → Settings. The Settings Index groups the options; All Settings provides a searchable view. Changes affect the plugin’s generated breadcrumbs, while individual blocks and widgets also have their own controls. See the Settings panel reference for every option.
Choose the home crumb and hierarchy
In Controls → Home Breadcrumb, decide whether to include the home crumb. You can override its URL, choose the website title or a custom title, and display the crumb as text, an icon, or custom HTML.
For hierarchical post types and taxonomies, choose a full hierarchy, the direct parent only, or no hierarchy. For example, a nested page can show all its parent pages or just its immediate parent. These choices affect the route, not where the trail is inserted.
Control where breadcrumbs appear
In Visibility, enable or disable trails for the relevant page types, such as the home or posts page, search, archives, individual post types, and taxonomy archives. Additional controls appear for supported active plugins. Visibility and placement work together: enabling a page type does not insert a trail by itself.
Select paths for posts and taxonomies
In Main Paths, choose a path for each post type or taxonomy. The available choices depend on the content type and site. For example, to include a category route for posts, select Taxonomy Term for Posts and choose the category taxonomy. Review the categories assigned to a sample post and test the result.
Where available, options can also add a posts page or post type archive. Hierarchy settings and the content’s actual parents or terms affect the final trail. See Main Paths for the available controls.
Adjust markup and appearance
Under Markup, choose a separator, an ordered or unordered HTML list, title normalization, and whether to include JSON-LD rich snippets. Under Styling, adjust font size, line height, spacing, alignment, and link decoration. Preview the trail with your theme after changing these options.
JSON-LD can help search engines understand the breadcrumb structure, but it does not guarantee a particular search result. The separate Only Rich Snippet integration can output structured data without a visible trail. Check the page output when combining integrations to avoid unwanted duplicate structured data.
Override titles and display
In Advanced, enable Override Titles or Override Display and save to reveal the corresponding settings subpanel. Titles change the text for supported breadcrumb types; empty fields use their defaults. Display overrides control how those values appear and can contain HTML; %title% represents the title. See Titles and Display for details.
If WooCommerce or bbPress is also generating its own trail, the Advanced settings include switches to disable their breadcrumb output. Check the page after changing them.
Use multiple paths or a menu
These features require BreadcrumbsPress Pro. View pricing and plans.
Multi breadcrumbs can show several available paths to a post, such as paths through its author, dates, or taxonomy terms. Use the Multi Breadcrumbs block, Elementor widget, or shortcode. Select the path groups you want; a group only produces a trail when it applies to the content and site. Multi requires a concrete post or page context, so test with a representative item.
Menu breadcrumbs render the items of a selected WordPress navigation menu in menu order. They do not automatically select the current page’s ancestor chain. Create the menu and use the Menu Breadcrumbs shortcode with its numeric menu ID.
Pro also provides Tweaks for collapsing intermediate crumbs in long trails and shortening long intermediate crumb text. These affect the visible presentation without changing the breadcrumb sequence in the JSON-LD snippet. See Settings: Tweaks.
Troubleshooting
No breadcrumbs appear
- Check that the plugin is active and that a placement method is configured for the page. For a theme method, confirm the selected theme and location; for manual placement, confirm the block, widget, shortcode, or template code is present.
- Check Visibility for the page type and test a different supported page. A Multi block or widget also needs a usable post or page context and an active Pro license.
- In an editor template, select an appropriate preview and check the published front end. Clear or refresh relevant caches after changes.
- The Overview activity indicator does not cover every method or cached request, so it should not be the only check.
Breadcrumbs appear twice
Look for more than one active placement method: a theme integration, a block or widget, a shortcode, template code, or another plugin’s breadcrumbs. Remove the extra placement or disable the relevant third-party output in Advanced settings where supported. Also review structured-data output separately if using more than one integration.
The route or appearance is unexpected
Check the post type or taxonomy’s Main Paths and hierarchy settings, the content’s assigned terms and parents, and the home crumb settings. Check the selected separator, styling, title and display overrides, and the individual block or widget controls. If a supported theme has been modified, its placement or CSS may need adjustment.
A Pro feature is unavailable
Check that the Pro edition is installed and active and that its license is active for this site. For activation errors or moving a license, see License Activation. Elementor widgets additionally require the supported Elementor version and atomic widget functionality.
Maintain the plugin
Keep WordPress, PHP, and BreadcrumbsPress compatible and up to date; see Install & Update. In Tools, export settings before major changes and use an unmodified export from the same plugin version when importing. The reset tool can remove settings and optionally disable the plugin, so make a database backup before using it.
Use the Account and Upgrade panels for available license and account actions.
